
If you’ve ever wanted to upload a file directly from your iPhone to your home PC, this post is for you. Maybe you downloaded something on your phone and don’t want to upload it to cloud storage just to transfer it. Or maybe you have a PC that acts as your personal file server and want easy access from your iPhone.
The good news is, your iPhone can connect directly to your Windows PC over your Wi-Fi network. This saves mobile bandwidth, gives you full control over your files, and skips the need for a third-party platform.
Note that this guide was tested with the most recent versions of operating systems, Windows 11 and iOS 18.
Step 1: Share Your PC Folder
To make your PC accessible to your iPhone, you’ll need to enable file sharing and make sure the right folder is shared.
1. Set your network to private
- Go to Settings > Network & Internet > Wi-Fi
- Select your connected network Choose Private
2. Enable file and printer sharing
- Open Control Panel > Network and Sharing Center > Advanced sharing settings
- Under the Private section, turn on File and printer sharing
3. Share a folder
- Right-click a folder you want to access Go to Properties > Sharing > Advanced Sharing
- Enable sharing and set permissions
4. Find your PC’s IP address
- Open Command Prompt
- Run ipconfig
- Look for the IPv4 address (for example, 192.168.1.45). Save this for later
Step 2: Configure a Local Account in Windows
To connect to your PC over SMB, your iPhone needs a Windows username and password. That means you need to be using a local account, not a Microsoft account. Unfortunately, as of iOS, you can’t reliably log in using your Microsoft account email from the iPhone Files app.
If you’re currently signed into your PC with a Microsoft account, you can switch to a local account.
- Open the Settings app on your PC
- Go to Accounts > Your info
- Select Sign in with a local account instead (You’ll only see this option if you’re using a Microsoft account)
- Follow the prompts to set up a local username and password
- Sign out and finish, then log back in with your new local account
Once that’s done, make sure your new local account has access to the shared folder you set up in Step 1.
Step 3: Make Sure Your Firewall or Antivirus Isn’t Blocking Connection
If you’re using antivirus software with a firewall, you may need to make sure SMB file sharing isn’t being blocked.
In general:
- Set your network type to trusted or private
- Allow traffic on the following ports:
- TCP: 445 and 139
- UDP: 137 and 138
- Apply the rule to svchost.exe, which handles Windows file sharing behind the scenes
For BitDefender Users
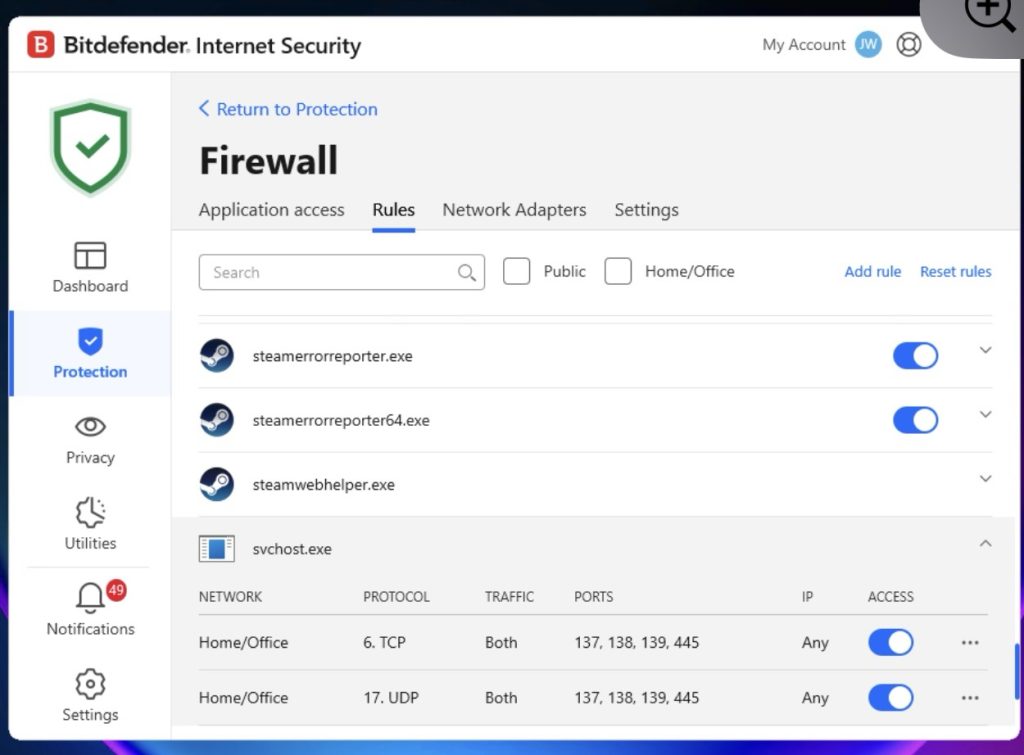
I use Bitdefender Internet Security, and I had to manually configure the firewall to make this work. If you’re also using Bitdefender, here’s what to do:
- Open Bitdefender > Protection > Firewall > Rules
- Click Add Rule Set: Application: C:\Windows\System32\svchost.exe
- Direction: Both
- Protocol: TCP and UDP (one rule each)
- Local Ports: 445, 139, 137, 138
- Network Type: Home/Office
- Save the rule
- Restart your PC (important!)
Step 4: Connect from iPhone
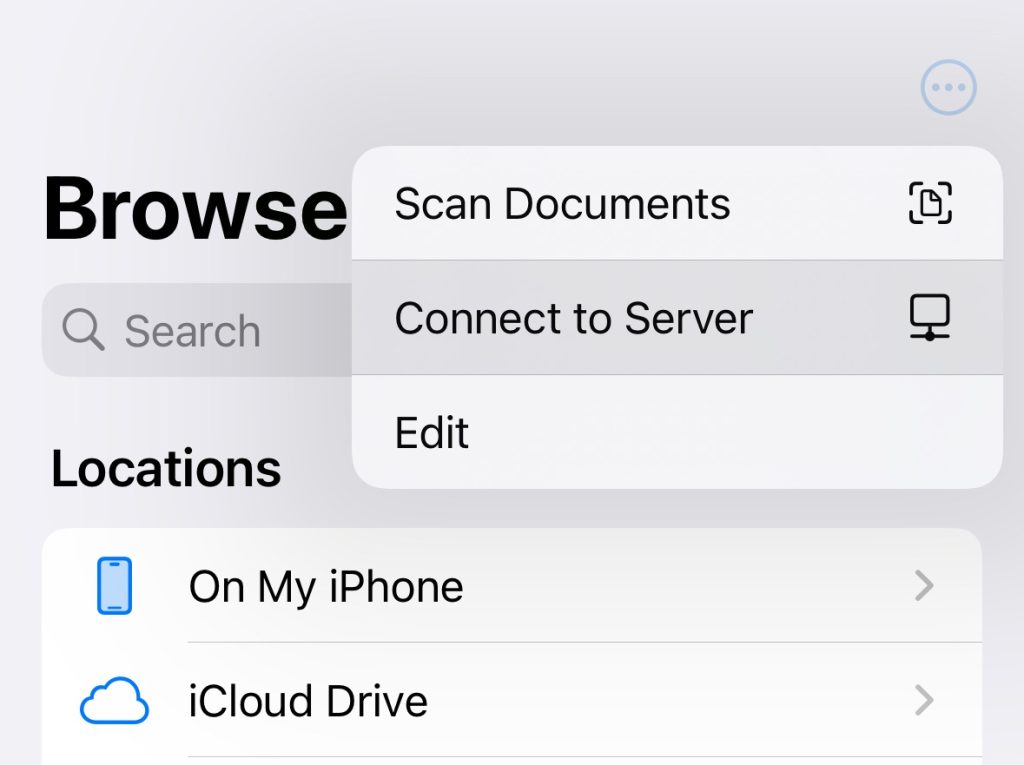
- Open the Files app in iOS
- Tap Browse, then the three dots in the corner
- Tap Connect to Server
- Enter your PC’s address using smb format:
smb://192.168.x.x - Tap Registered User. Enter your local Windows account username and password
You should now see your shared folder and be able to move files between your phone and your PC.
That’s It!
Now your iPhone can connect to your PC like a local drive. It’s fast, efficient, and doesn’t rely on the cloud. You can upload and download files freely, without syncing delays or extra storage subscriptions.
hi